STARWEB EMAIL DISCUSSION GROUP (THE SEDG)
(Sponsored by Flying Moose Technologies' Starweb Analyzer
- http://www.flyingmoose.ca)
VOLUME 90 March 2013
Six years in the making - Welcome back!
CONTENTS
Feature Article – SW-A1371: How to win an anonymous game as a berserker
by Lin Goldstein, Jack Fulmer and Glen Hadaway
Questions – Who is playing SW now?
SEDG Web Page URL
The Swap Corner – SWAP and Windows 7
FEATURE ARTICLE
SW-A1371: How to win an anonymous game as a berserker
Glen’s narrative starts at T12 when he meets Lin. Glen is referred to as PIR5. Lin played BER1.
First, Lin’s maps followed by the narrative.
Map 1: Worlds I explored, probed, or inferred and their original owners
(World #) in parenthesis = home world
(202)
PIR2
|
11 --------- 102 163 21 184
PIR2 PIR2 PIR1 ? PIR5
| | / | | | | /
219 --------- 156 26 205 ---175 172 181 79
PIR2 PIR2 PIR2 BER1 BER1 PIR1 EB1 PIR5
| | / | | /-----/ / \ /
150 164 --------- 81 177 -------- 119 68 ---252
? BER1 BER1 BER1 EB1 EB1 EB1
| | | | | | |
174 ----------48 (53) –143 138 --------- 202 |
EB2 BER1 BER1 BER1
EB1 EB1 |
| / | | | | / |
|
127 51 7 ---------- 152 255 -------113 103 (233)--147
EB2 BER1 BER1 BER1 BER1 EB1 EB1 EB1 EB1
| / | | | | / | |
36 ---------- 37 100 – 204 165 ------- 121 |
EB2 BER1 BER1 BER1 EB1 EB1 |
| / | | | | |
| 65 -------- 67 146 -------- 140 230 --128
| BER1 BER1 BER1 BER1 EB1 EB1
| | / | | / | | |
55 ---------- 136 9 182 -- 73 226 12 --------135 39
EB2 MER1 MER1 BER1 BER1 BER1 PIR4 PIR4 PIR4
| | | / | |
170 52 2 160 7
MER1 PIR3 ? PIR4 PIR4
Map 2: My worlds within one move of my HW
205 --------- 175
(0,3,153,18) (0,5,147,17)
| /
164 ---------- 81 177
(0,3,139,15) (0,4,100,7) (1,1,43,16)
/ | |
*48 53 ----------- 143
(0,4,112,20) (30,2,50R) (0,6,95,7)
/ | |
7 ---------- *152 255 ---------- 113
(0,3,90,16) (1,3,128,9) (0,4,84,17) (0,5,129,16)
| | /
37 100 -------- *204
(0,2,149,16) (0,4,180,18) (0,2,35,10)
|
67
(0,4,108,17)
(a, b, c, d) a = industry b = starting mines c = population limit d = turn reaches limit
I killed population at all worlds except those with *,
where I had fleets ready to kill population at game end.
Note: since population growth happens before population killed, for example, at a world reaching limit at turn 18,
I gained maximum points by killing at turn 17.
Map 3: EB1’s area
181
(1,5,43,17)
/ \
(177) – 119 68 ------------ 252
(0,1,66,16) (0,2,55,10) (0,5,135,16)
\ | |
138 ----------- 202 |
(2,3,113,15) (0,0,102,10) |
| / | |
(113) *103 233 ----------- 147
| (0,1,78,19) (30,2,100,9) (3,6,98,8)
| / | |
165 ----------- *121 |
(0,5,195,15) (0,6,123,8) |
| / |
*140 *230 ---------- *128
(3,2,108,20) (0,2,122,22) (0,4,159,16)
(a,b,c,d) a = starting industry b = starting mines c = population limit
d = turn reaching population limit
* before world means I didn’t kill the population there.
SW-A1371: How to win an anonymous game as a berserker
By Lin Goldstein
Introduction
I had played 4 anonymous games in the late 70’s and early 80’s – 2 as a pirate,
and 2 as a berserker. I did well in the pirate games, but didn’t win – although I
might have won one if I hadn’t had to fight a berserker as my first conquest
(but did get his HW to over half production before the end of the game).
The berserker games both ended with a score of about 50%.
In my earlier games as an anonymous berserker, I avoided conflict. Every ship
available to a berserker in the end game is 16 points if used for killing population
(2 robots killing 4 population each times 2 points/population, and I estimate 16 points
for each ship used in a PBB drop, since a 100 population world is typical and that produces
400 points for 25 ships, or 16 points/ship). Thus ships losses in combat are expensive.
But from my earlier failures, I knew that if I wanted to win, I would need to go to war
this game to gain a second HW for production, high population worlds for gaining points,
and more keys to use to advantage in the end game.
In the following text, I will identify the other players by a character type abbreviation and
followed by a number, similar to previous anonymous game write-ups, although I will do so
immediately even though I usually didn’t know the character type then.
I emphasize my strategy and tactics in the early turns, as they set the stage for my ultimate success.
Turn 1
The HW was a standard 3 connector. I don’t go for the 250-1 shot of sending a key to a random
destination, but send extra fleets to known worlds to balance the ships in case a loose key isn’t found there.
Turn 2
I captured 2 keys, but they were at the same world, and at the world where I only sent 1 key.
All worlds were 3 connectors. I had 7 keys and 6 adjacent unexplored worlds; I sent 1 key
home with 5 Metals and explored the 6 unknown worlds.
Turn 3
I captured all 6 worlds, but only 3 new keys. The map looked like a standard hex map, except
2 worlds had 4 connectors. I was adjacent to 11 unexplored worlds, but had only 10 keys.
There was good news in that I already had almost all the Mines I needed (32), and almost all
of my worlds had high population and high population limits.
With the key shortage in mind, but plenty of Metal, I decided not to maximize exploration,
but to send the 10 ships available at my HW to gather Metal, and bring back a 6 ship fleet with
4 Metals for future hauling, leaving 8 for exploration with 3 ring-3 worlds to which fleets not sent.
I did not create blind spots, however; I used the trick of moving to one connection, then back
to the starting world, and moving to a second connection. This would create contact if another
player went to the first world, and provide a (hopefully) free probe of the world.
Turn 4
Contact! I met 3 players, PIR1, PIR2, and EB1. From their scores, I thought they were all
pirates. PIR1 and I moved from one of our own worlds to one of the other’s worlds; I having
captured his world (W172) while my world was protected by a home fleet (W177). I loaded
Metal from his former world, to take back to my HW, but left the world unguarded so he could
recapture it; I definitely didn’t want to antagonize a likely pirate by trying to keep control of
the captured world.
PIR2 and I had encounters at several worlds. He captured one of the worlds through which
I moved as a “free” probe (W76), a good world with an industry, 3 Mines, and a key. I moved
to his W102 and W156, capturing W156, and could identify common connection W11 as a ring
1 world. I left W156 unguarded, but probed W11 so I could identify his HW #, assuming W11
was a 3 connector, as I knew W102 and W156 adjoined W11. I left W156 unguarded and moved
my probing fleet out of range of his forces so he wouldn’t know I probed W11. Also at W156
I dropped a Metal as a CG, and loaded my fleet. PIR2 was tentatively my target, as I figured
I could make a surprise attack on his HW. He moved a 1 ship key to my W164, guarded by a
home fleet, and a 3 ship key to my W205, also guarded by a home fleet.
EB1 and I both moved to W113, but had no other contact. My fleet was fully loaded, and
I dropped a Metal as a CG for the remote case in which he fired at me. His key had the Lesser
of Two Evils, and I expected him to drop it and leave the world. I would create a neutral key
with the bad artifact, and keep the world.
The other two worlds “free” probed were W119 and W204, both neutral. I decided not to
go after W119, as it had only 1 Mine, no key, and a small population and limit, but W204 had
a key, also with a small population and limit and only 2 Mines. I decided to go after W204,
and if captured, give it to a pirate. I also captured 4 neutral worlds with 3 keys, bringing my
key total to 13.
I built my key at my HW to 13 ships and moved it out to get Metal. I moved a 1 ship key
to my W7, a 3 industry world which would have 4 ISHIPS and the Silver Lodestar, and sent
1 ship exploration fleets to only 2 of the 8 unexplored worlds adjacent to worlds I captured,
besides the 2 ship key I sent to W204. I was not hopeful of capturing more worlds when I
already had 16, about my share. A few 1 ship keys were left to guard worlds, hoping that
a pirate would not move in with a 4 ship key or larger. I moved 5 keys with 17 ships and 16
Metal back to my HW, including 9 ships and 9 Metal from the key that didn’t explore (1 ship
was used to guard against PIR1 moving to the pick up point). That amount would virtually
guarantee having full production on turn 8.
Turn 5
I met EB2, who captured my W37 and moved to W48 with a 4 ship key which was guarded
by a 1 ship key. So I knew he wasn’t a pirate. His score was likely 405, a multiple of 15, so
I figured there was a good chance he was an AC (AC’s tend to have scores with multiples of 15).
I captured W204 and the key there, and captured both of the 2 ring-4 worlds to where I sent
1 ship keys (W51 and W65), although I would have to send larger fleets there to put ships on the
loose keys. Seemed like EB2 should have been able to get to W51 and W65, but he knew from
the fleet movements at W37 and W48 that I moved to the worlds, so they were probably safe
(but I maintained keys there, just in case, until I had control of the loose keys). Nobody moved to
W67 with its 3 unexplored connections, so I made plans to explore in that direction in case there
was a dropped player.
PIR1 moved his fleet at my W175 to one of my other worlds and probed the ring 1 world.
He was a possible threat, as now he could surely identify my HW. He could know that I probed
at most one of the two unknown (to me) connections to W175, as I loaded 2 Metals on to what
started as a 3 ship key (and moved it to my HW where he couldn’t see it, not expecting an ambush
at W177).
PIR2 strangely moved 4 1 ship keys to W102 where I left, and probed a 3 connector ring 1 world
at which he already knew 2 of the adjoining world, thus discovering my HW #. He withdrew from
my worlds. He dropped a CG at one of my worlds at which he was at, but I knew he wasn’t a merchant
because there were no low scores on my printout.
EB1 dropped the Lesser of Two Evils at W113, but moved up with a 1 ship fleet with a plastic.
I figured he would finally leave the world to me, and I’d capture the world while bringing in a
plastic of my own to make into a neutral key with the other two bad artifacts.
I only sent a loaded 1 ship key in addition to my 13 ship hauling key back to my HW. With the
18 T-6 builds and the big stockpiles from the Metal-rich web, this would cover full production for T-9.
With my 5 keys at my HW, I sent one to W152, a 1 industry world with
3 I-SHIPS and some Metal, a 9 ship key at peace to W67 for Metal, at peace so a 1 ship or a 2 ship
fleet by a opponent would not be captured and he would not know if I was a pirate, 1 key to W48
on the remote chance that EB2 contested W48 and also to move on to W51 to put a ship
on the loose key, 1 key to W113 to free my fleet there to move to W138, the connection EB1 did
not move to, and 2 key to W204 to capture the world and key if nobody moved there (only possibility
was from W146). Instead of bringing 4 Metal back from W7, I dropped a Metal there and moved a
sizable key to W65, to likely pick up the loose key (EB2 had W136, the only connection not owned
by me, and he knew I moved to W65), and be able to explore through W67. I sent keys to W9 and
W182 off of W67, to hopefully pick up worlds and keys from a dropped player’s area.
Turn 6
EB1 withdrew from W113, and I captured a key and a world with a plastic and the Lesser of Two
Evils. Even better, he gifted me a key at his HW (W233)! He had only 3 Metal there and also 5 keys
with 26 ships. Obviously, he fell for the CG unloading and thought I was a merchant.
I had fleeting thoughts of still going after PIR2 and trying to cooperate with EB1, but quickly
realized it would be better to target EB1. I estimated I could send about 30 ships on T7 to W113,
while barely staying at full production, and from there to his HW. My key at W138 (a 2 industry
EB1 world) and the one at his HW could explore his area, and with 3 or 4 keys and over 30 ships
at his HW, he would be hard pressed to defend on T9 even if he suspected a trick and fired at me.
Still thinking EB1 was a pirate, I ordered a gift of W65 to him – worth only 3 points/turn to an
EB, but practically worthless for anything but plunder.
PIR1 left my area from W175 to W163. I still don’t know what ring that world was to him.
MER1 moved to W67 (guarded) with a 3 ship key from W9, and I explored W9. EB2 left
W37 unguarded, but I didn’t try to retake it as he wouldn’t be inhibiting the population growth
by plundering it; in fact, I decided to let him keep it. Since there were no scores that were multiples
of 15, he wasn’t an AC, and with no converts, I knew he was an EB and could use the points.
MER1’s score of 179 suggested a merchant or an active berserker.
I captured 2 worlds with 1 ship keys, both with loose keys. I was now above average in keys,
with 19, although 2 keys were loose. But I had 5 ships with 2 keys on W65 (after I would drop
1 ship in order to guard the world for EB1). I moved to W73 and W146, which from the map
were likely not owned since nobody moved to W204 from W146, and went to the worlds with
loose keys, sending sufficient ships to use them.
Turn 7
I met PIR3 at W52, which he had captured last turn and plundered. So he was almost sure to
be a pirate. EB1 was identified as an EB as he converted 4 ships to make 1 industry at W138.
I tested and confirmed loader status last turn by loading 1 Metal. I gifted EB1 a 14 point/turn
world to continue the ruse.
I also gifted PIR1 a low population, low Mine world, and moved a fleet with the Silver
Lodestar to the world. With luck, if he planned to attack me, this would dissuade him. I also
wanted to give PIR2 a world, but ran into the gift limit.
EB1 sent only 6 ships to his HW, but had 25 Metals there.
I captured W73 and W146, both having keys. I sent only 1 ship to W73, but it had an industry,
so I had no loose keys. With one made neutral at W113, I now had a comfortable 20 keys.
MER1 sent a key to W65, where I wisely left a guard ship, and probed and unloaded a CG at
W67, moving his key to W100. As I would be at full production next turn, I had no need to give
him stuff for hauling that I would probably need to fire at later in the game, but I planned to declare
him loader and ally next turn in case he want to move his own fleets to my area.
As planned, I moved 36 combat ships on 2 keys to W113. My surplus Metal drops at W53 meant
I only need to have 19 ships come back with Metal on T8, and I also took advantage of my industrial
worlds, so I did better than my original 30 ship estimate.
Turn 8
I discovered PIR4 firing at EB1’s former W128, while moving from W147 to W128 back to W147.
It looked like PIR4 made a capture there last turn, but withdrew 8 keys to deal with another threat.
Lucky for me, he didn’t press on, as he would have captured my now 7 ship key at EB1’s ring 1 W147,
and challenge me at EB1’s HW the following turn.
I now had fleets of 3 and 7 ships at 2 of EB1’s ring 1 worlds, and I thought if I moved 2 large
fleets into EB1’s HW without proving a double Metal cargo capacity, my jig would be up (how gullible
was this guy?) So I declared him non-ally, and tried to ambush him.
I moved a key through W140 on route to W127, and discovered a neutral 3 industry world, but no
loose key.
PIR3 moved a 1 ship key to W182, which I didn’t bother to guard as it was a low population ring 4,
and PIR3 knew I had been there. So he captured it. I would show him good will by letting him keep it.
I wasn’t sure why this world wasn’t someone’s ring 3 – did PIR3 miss turns and thus slow to explore, or
was it a quirk in the map?
I figured there was no point in gifting PIR2 a world this turn, as he would already have started an
attack on me by the time he got it, if I was his first target. I might as well let the people grow, as I had
no more low population worlds.
I sent 2 keys with 38 ships to W113.
I did in R1 on W204 to show PIR1 I was a berserker.
Turn 9
MER2 moved into W205 and out to W102, losing a ship to ambush, so I figured he was a merchant
exploring PIR2’s area. It was too early for someone to conquer PIR2 and make such a move.
PIR3 moved to W73, again which he knew he was at, so he was being a nuisance. Since he was
exploring outside my ring 3, it wasn’t too annoying, and I decided to leave W146 unguarded since it
would grow to its population limit this turn.
EB1 didn’t move through my ambushes, but at his HW I had 3 keys with 38 ships to his 5 keys with
34 ships plus 24 builds. He couldn’t tell I declared him non-ally because I only would suppress from 30
to 26 industries and he had only 24 builds. He would have an almost impossible time stopping me from
robotizing his HW, in fact I only did a R28 in case he didn’t fire at me, although my moves on the last
turn should have made it clear I was attacking him.. MER1 arrived at my HW with a 1 ship key.
I moved a 2 ship key to W37, not at-peace, to show EB2 I had him as an ally, and do a R1 and L1 next
turn to show him I was a berserker and see if he would let me load from the world. I did a L1 at W204
to see if PIR1 had the courtesy to let me load from the world I gifted him.
I captured W140, the 3 industry ring 3 to EB1 which he never captured.
I gave PIR2 W51, a ring 4 world, and moved in a 2 ship key to R1 and attempt to load Metal.
I made a mistake and captured the bad art key at W113 (forgot to put a key at peace).
I now had the impressive Score=6
Turn 10
I met PIR4 at W12 next to W140. From the Turns= and Plunder information, it looked like a ring 2 world.
Also, it was a 2 industry world and he had plundered it twice! Looked like a poor player.
I robotized and captured EB1’s HW (W233); EB1 didn’t fire at me, kept me on as an ally, and I had 50
ships (only 1 home fleet captured) and 22 Metal on the ground vs. 5 fleets with 26 ships. I also captured
W121 with 16 Metal and 7 Mines, which would provide sufficient Metal to get full production for W233
on turn 13.
EB1 and PIR1 didn’t have the gratitude to declare me loader.
I had 15 Metal ready to unload on W233, and 11 ready to bring in. I targeted EB1’s fleets at W233 as if
he would drop out and the fleets were unloaded, leaving plenty of I-SHIPS and P-SHIPS to guard the world
if he did fire (although if he sent everything he had to his HW, he might be able to neutralize it the following
turn).
PIR3 captured W146. I also gifted W226 to him, and sent a 4 ship key to W204 (the world I gave PIR1
with the Silver Lodestar), at peace. If PIR3 moved there, he would capture W204, but I would blast him
and give the world and artifact back to PIR1.
PIR2 declared me loader.
Turn 11
EB1 did indeed miss the turn, and I captured 5 keys at W233. It looked like EB1 had dropped with me
declared ally and loader. I captured W138 with 38 Metals and 5 Mines. I now proceeded to attempt to
capture many other worlds and a few keys in EB1’s area. However, I was worried that EB1 might also be
under attack by PIR1, as he sent a key in that direction on
T8 and it didn’t return. So I was cautious in moving to worlds in PIR1’s direction, and probed a few of
them instead.
It was already time to think about the end game. I guessed an ending score of 8500-9000, and it looked
like my worlds would be ready in population by T16 and I had enough production and keys to construct and
position bombs for passing that total, with 2 additional bombs ready on T17 for scoring on T18’s printout if
necessary with a higher end score. This assumed I was able to maintain production at W53 and W233 through
T15, and nobody captured my fleets.
W138 and W147, EB1’s worlds with 3 and 2 industries respectively, were building I-SHIPS which I would
be able to capture after robotizing the high population worlds.
PIR3 did indeed capture W204, and I fired at him but gave him my key at W226 to make up for it.
If my score assignments were correct, PIR4 didn’t plunder anything, so I thought he had dropped. I sent a
key to W12 to robotize it and capture the I-SHIPS. This was probably a bad move, as whoever was conquering
PIR4 might be more likely to come after me when he reached W12.
I put a ship on the once-again-neutral key at W113 with the bad artifacts to prevent future accidents.
Hopefully, with the world ring 3 to both my HWS, I wouldn’t need to move through and get ambushed there.
Turn 12
W12 had action, with a plunder of the world and a 4 ship PIR4 key and a 13 ship MER2 key moving
to the world. The merchants were starting to score points, so I was hoping for the turn
17 game end to win the game in case one or both had a good hauling business.
PIR1 was NOT invading EB1’s area, so everything looked peachy.
I ordered robotizing W147, but had forgotten to put my fleets at peace, so would lose 2 I-SHIPS that
wouldn’t be built this turn.
W37 got its Mine increase, and I moved a key there to finally recapture the world and pick up its Metal.
I started a massive Metal hauling program, with my big Metal stockpiles, to accumulate a big excess of Metal
on my both HW so I could free my hauling fleets for PBB drops.
I captured PIR3’s former key at W113 with the Silver Lodestar, dropped the artifact and a home fleet at
the world, and gifted the world back to PIR1. Since it was a ring 3 world off my normal movement routes,
it didn’t look like I would be ambushed there.
PIR2 showed up at W205 with a key with 2 berserker category artifacts. Finally I got something in return
for the worlds I had gifted, although the purpose of the gifts was to deter attacks by showing friendliness, not
to get something in return.
Turn 13
PIR5 moved to W147 with 5 keys and 83 ships and captured my robotizing fleet and a 17 ship key of
mine that was sent to pick up Metal. At least I got the 196 points for robotizing the world. As W147 and
W233 (the HW) were adjacent, my second HW was in jeopardy.
I would obviously be concentrating on scoring points rather than having a fire fight with PIR5, but PIR5
did not know this. I moved everything I could to W233 and dropped I-SHIPS at W233, except for 1 PBB
fleet sent out. I would have 6 fleets at W233 for sending 3 2 key teams to the 3 worlds in EB1’s former
area I still wanted to bomb; this way I could escape from the bombed worlds with the remaining ships after
the possible fire on them at W233 next turn and leave ships on the PBB fleets if necessary if I encountered
opposition at the world. I had probed W128, PIR5’s entry point to W147, and he had captured 3 1 ship
keys, did a 2 ship AH, and moved up an 11 ship key. I doubted that he would have more than 90 ships
next to W128. I would have 73 ships on fleets and 46 ships as I-SHIPS. I didn’t think PIR5 would have
enough to capture the fleets, and I could cover 165 PIR5 ships at the HW without losing builds. He probably
would fire at industry, population, or home fleets anyway, so I expected my bombing and escape of ships
to go through without problems.
Meanwhile, I ordered a R15 on EB1’s 3 industry W138 to robotize the world and capture 16 I-SHIPS,
killing 103 people, and captured other worlds and keys in EB1’s former area.
PIR5 sent his gift fleet to W140, and I fired at it and would capture it, but I gave him a world.
Turn 14
PIR5 mysteriously left only 10 ships at W147 to fire at the 7 I-SHIPS, and the rest of his forces appeared
to retreat. I proceeded to abandon W233, leaving a 2 ship key behind, and sent out PBB fleets to the 3
remaining high population worlds in EB1’s former area, as well as some robotizing fleets. It was nice not to
have to worry about enemy fire. The only problem was
W252, where he might send stuff this turn; I sent 36 ships on 2 keys, one with a PBB, figuring that would
avoid capture and I could always retreat with the PBB fleet if he sent a lot of ships.
For the second turn, I probed one of EB2’s worlds, ring 4 to me, in case I wanted additional targets to
bomb in case of an invasion of my original area. I was now planning a massive bomb in my original area on
turn 17, one turn delay due to the PIR5 attack on me.
I sent almost everything I could to W67, including a PBB. If PIR3 or MER1 attacked me, I had options,
and if they didn’t, it would be too late for them to interfere with my plans.
I ordered the bombing of the 195 population world I moved to from W233 last turn, and that and a few
robot attacks would increase my score from 976 on T-14 to 1940 on T-15.
Turns 15-17
PIR5 was being sneaky and appeared on T-15 with a huge armada at W121, capturing my 1 ship PBB fleet.
On the other hand, my “bluff” at the HW W233 worked, as he sent nothing there and my 2 ship key would
escape with 30 builds. My 2 other bombs in EB1’s area would drop, but he had 21 ships on 2 keys to my 36
ships on 2 keys at W252. I figured PIR5 would target the PBB fleet, or both fleets, but when he targeted
only the non-PBB fleet, with me putting 11 ships on the PBB fleet, I ended up with 2 ships short to make 3
PBB fleets at the meeting at
W238 with the W233 fleet, the W252 fleet, and other fleets, so he ended up delaying one bomb drop on
turn 17. He also captured the 11 ship fleet the following turn.
It was now time to complete my plan to win the game, which I had made several turns ago.
Only PIR1 or PIR2 with an invasion of my area and targeting outside the HW would stop me from scoring
more than 8500 points. On turn 15 I kept all fleets at my HW and moved in my Metal gathering fleets and
some ships from the former EB1 area. If PIR1 or PIR2 invaded, and hit the HW, this would prevent a
capture and hopefully they would target industry, population, or home fleets, letting me escape with enough
ships for bombs to win. As they knew my HW from their early game probes, and I couldn’t defend my
other worlds against pirates anyway, this was the best possible precaution against PIR1 and PIR2. I would
have over 100 Metal on W53 on T-16, with some more scheduled to drop, so there was no need to haul.
Also there was no need to send out PBB fleets on turn 15, as I wouldn’t need the points the T-17 printout.
I did move a few small fleets to robot-kill population at worlds at the population limit, as I did T-14.
I also delayed dropping a bomb on T-16 to T-17 as I didn’t want to scare other players with a higher score.
My score went from 3401 on T-16 to 4138 on T-17. I saw MER2’s score in this period, and he wasn’t doing
too well, but I didn’t bother probing a MER1 world, to see MER1’s score, as I wasn’t going to change my
plans anyway.
AC1 appeared at W140 as I arrived there to bomb it. Obviously he wasn’t a pirate, because he didn’t
capture my fleets, but his 13 ship key suppressed the industry. I had 4 ships there on
2 keys and moved them away so I could escape with the bomb, but the best alternate target was a 35
population world instead of the 86 people at W140. So I lost about 100 points. AC1 didn’t fire.
A PIR1 fleet arrived at one of my worlds on T-17, but there wasn’t even a PBB fleet there, and
it was too late for him to cost me points.
Also on T-17, I received notice through a failed gift order that PIR1 was capturing a world from
PIR2.
On T-17, I ordered the dropping of 10 bombs and did an R4 to kill most of the population on the
world I gifted to PIR2, which would net me about 4500 points.
Turn 18
The game was over. I won with 8598 points to second place PIR1 (Jack Fulmer) with 4764 points.
My only remaining population was the 218 on two backup worlds where I now had PBB fleets (one
of which I would have bombed already if I hadn’t been outsmarted by PIR5 at W252), and I had
only 39 ships to my name. The victory point limit was 6000 – much lower than I had expected.
I had won with only killing population on worlds which I or EB1 had originally owned.
Glen’s Story
Turn 12
On my northern front I discover a new player with a probe of EB1 W147.
Two fleets =26 ships and a
fleet moving through to W252
without getting ambushed. As W147 is probably a first ring of EB1,
this NP is an ally of EB1
possibly a merchant. I decide to send 4 F=87 into W147 to make a statement
and see what happens.
On my southern front I meet another new player whom I suspect is a
berserker.
I send half my reinforcements north and half south.
Turn 13
Gadsooks! I
make a capture at W147, 2F=18, but the NP is a berserker (B1) and has made a successful
robot capture of the world. B1
has sent 2F to W252 and 1F to W233 and I can only guess which one
is EB1 HW. I decide to probe
both worlds, leave a small force 2F=10 to shot the world into neutrality,
and retreat out of sight and
see what kind of reaction B1 will respond with. I move all area fleets to
staging areas.
Holy Moley, in the south I discover the other
NP is indeed a berserker (B2).
Half the reinforcements go north, half south.
Turn 14
W233 turns out to be the HW but it has been robotized, has been owned
for 5 turns!, has 55 metal,
B1 has 6F=149 there. W252 is still controlled by EB1 and only shows
passage of B1 2F thru to
unexplored W68.
The maximum force I can put on W233 is 17F=163. The highest score I can see is
2458 so neither berserker has seriously started killing. With such a
strong force at his disposal, I’m
surprised that
B1 didn’t move into W147 to act as a blocking force to protect his 2nd HW. He
obviously
has 30 to 60 ships hauling rms and possibly could have a reinforcement fleet coming in
from his original
Hw. If I send my boys into
his HW, I might be in a protracted fight that I could possibly lose. If he’s
inexperienced, he
won’t have the discipline to wait me out and will come after me. If he divides
his
forces I’ll chop him up in no
time.
I decide to send a small force 2F=21 into W252 to possibly cut off some
fleets; reinforcements from
my home area to a northern
staging location; move my main force to W121, a first ring of EB1, to
hopefully to
make a major capture and start the encirclement of his HW. ALL reinforcement go north.
Turn 15
My probe of W233 reveals the entire story. Far from being a novice, I
learn to my sorrow he’s a Pro.
He’s sent all of his fleet and ships out the gap of the third first ring
world, W202. To kick sand in my
face, he’s had the audacity to
leave one F=1 for one final build. At W121 I make my “major capture”
1F=1 PBB. I send 2F=19 to the unexplored world, W233, and the remainder
into W233 after the
fox thats
gotten away. As a minor gamble, I send 1F=5 through W233 to W202 risking a
ambush
but seeing B!’s tactics I don’t expect one.
At W252 my 2F=21 encounters B1 2F=36 PBB. As he obviously isn’t moving
his PBB fleet and
will protect it, I fire at the
other fleet, probe unexplored W68, and send in enough ships from my
northern
staging area to make the capture.
My only hope is that he’s started PBBing to early
and will run out of gas or he’s being pressured
by other players that will
inhibit his scoring. I’ll keep maximum pressure on from my end but because
SWA1371 is a basic grid map without fast lines or long distance
connectors, I can’t chase him any
faster than one world at a time.
Turn 16
W233 is vacated of course, W202 I successful “ran the gauntlet” and
captured a B1 F=1 that has
just PBBed.
W252 I capture B! F=1 after his drop. W233 has already been busted, a four
connector world.
I send my biggest fleet to W138, all other new
worlds get visits as well.
Reinforcement all stay at home, they won’t be a factor in the northern
front or southern area now.
Turn 17
W38 that has 3I , I capture because B1 left it
without an I ship, a vacant key, and a M2 F=3 at
peace. B1 has his victory
locked in and is getting sloppy. All other worlds he’s busted and
moved on. Just to send a
message, I drop the PBB I captured on his HW.
Turn 18
Game over. B1 had superior strategy and perfect timing. Congratulations
on a fine win.
Closing Thoughts
This was an unusual game for me because I didn’t met any berserkers until Turn 12. When I did,
I immediately started attacking them but because I was hindered by poor
intelligence my
attacks were ineffective.
If my end game focus would have been scoring, I probably could
have finished second but thats
like kissing your sister.
Glen Hadaway, pirate SW A-1371
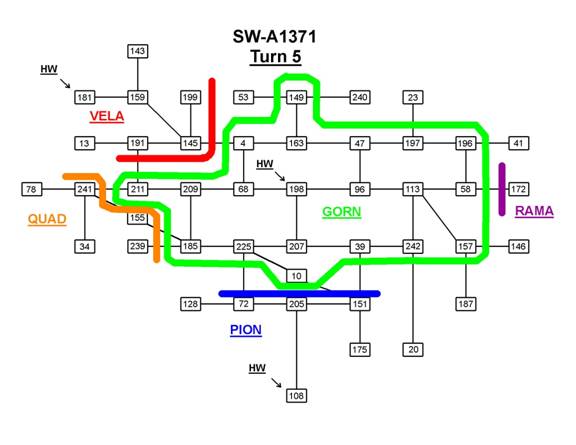
The Gorn Narrative SW-A1371
By Jack Fulmer
SW-A1371 was an anonymous Starweb game which began in December,
2009. In it I chose to play a Pirate character and was assigned the
character
name GORN.
Typically I play anonymous Starweb games. In the standard game rather
than a
multi-SW I game I almost always play either a Pirate or a Berserker.
I believe that both a Pirate and a Berserker must play aggressively to
win.
That's fine with me as I enjoy the challenge of capturing sufficient
resources
to win the
game. See previous editions of the SEDG for articles about
Starweb character choices written by myself and several other
players.
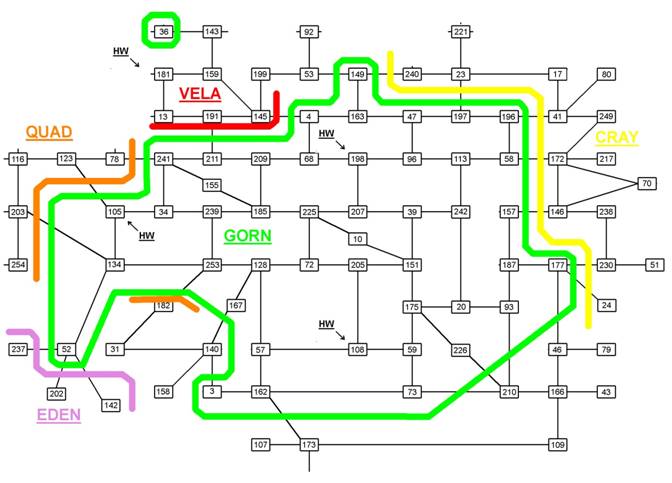
I have prepared two maps for
this article which I hope will help the reader
to envision
the game as it unfolded to me. For another way to give a sense of
the overall
strategic position in this game I ask the reader to envision a clock
face with my homeworld at the central axis of the hands. For example
PION's
empire, which
you will hear more about, was on my border from the 5 o'clock
to 7 o'clock
positions.
TURNS 1 THROUGH 3
-----------------------------
My turn number one showed my homeworld with three connecting worlds.
As usual I concentrated on fast exploration of all worlds within 1, 2
and 3
connections of my homeworld. As I wrote in earlier
editions of The SEDG
I will, if necessary, sacrifice some early metal hauling to explore as
quickly
as possible.
TURN 4 Score = 267
-----------
So far so
good... On turn 4 I own 14
worlds, 15 keys and 7 art. The map
of the web
at first appeared to be basically a hex but on turn 3 and this turn
I encountered some four connector and two connector worlds.
I met my first three other
players this turn. They are VELA, PION, and
QUAD. Both VELA
and PION "crossed over" exploration fleets with me. I
moved into a
VELA one industry world, W145, which he garrisoned with
1 I-ship. He moved into my world 4 and captured it as I had left it
undefended.
PION and I crossed over each other at two world pairs, W225 / W72 and
W39 / W151 and met at a third, W10, which was still neutral. QUAD and
I met at two neutral worlds W211 and W185.
VELA is at my 11 o'clock. QUAD
is at 8 and 9 o'clock. PION is at 5, 6,
7 o'clock. The rest of my periphery remains wide open for exploration.
I'll keep moving outward until stopped by another player.
I peacefully leave the VELA
world that I entered and send a fleet to
my W4 that
he captured. I keep fleets at both neutral worlds where I met
QUAD and the neutral world where I met PION. I leave the two PION
worlds that I entered
but probe the connection that they have in common.
That common world has to be adjacent to PION's homeworld.
If it is a
three-connector world then I'll know the number of his homeworld.
TURN 5 Score = 554
-----------
Even better, now I own 20
worlds, 19 keys and 9 artifacts including
2 Lodestars, the Treasure of Polaris, and no Plastics
at all. I am generally
happy if my
artifacts are a net neutral for scoring points (bad art netted
against good). It's always nice to have artifacts be a net positive source
of points.
This is especially so for a Pirate as in the long run points get
harder and
harder to obtain unless more and more worlds are continually
captured.
PION unloaded consumer goods
at W225 and moved, at peace,
into my ring
one W207 adjacent to my homeworld. He also unloaded
consumer goods at my other ring two world, W39, where he was on
turn 4. He
moved his fleet from W39 through my ring three W242 and
onward to W20
that I had not yet reached. Clearly he wants me to
believe that he's a Merchant.
I generally do not cooperate
with merchants in anonymous games
or do so
only for a very limited number of turns. This is because I want
to win the
game and it is relatively very easy for a merchant to win a
game quickly.
If they are successfully hauling for multiple players they
can score
many hundreds of points per turn. In PION's case it appears
he is quite
aggressive based on his move into my ring one. Because of
where he was on
turn 4 he had to know he was moving to my ring one.
So I'm going to have to make an early decision to either go to war with
him or
confirm that he's a merchant and let him haul for some number of turns.
My probe of PION's W205
confirmed it is a three-connection world.
W205 T/O = 4 and its third connection is W108. Therefor
W108 must be
PION's homeworld.
Meanwhile QUAD has also
dropped consumer goods at W185 where
we met
on turn 4. He moved back into his own territory from both
W185 and W211 allowing me to capture. His moves were very conciliatory.
His unloading of consumer goods may be meant as a merchant signal.
However, if he is
a merchant, I would have expected a him to either stay
at one of
the worlds at peace or move at peace farther into my territory.
VELA left my W4 that he had
captured on turn 4 undefended. I moved
in and
recaptured it. From his W145 I had probed W159 and moved into
W191. W191 was owned by VELA with T/O = 2. W159 had T/O = 4 with
onward
connections to W143 and W181. In addition three VELA fleets
had moved
from W159 to W181 and none to W143. These facts caused
me to assume
with a high probability that W181 was VELA's homeworld.
My other exploration fleets
had encountered one new player, RAMA.
I met him at my ring four W172. It had T/O = 3 so was almost certainly
on
his ring two.
I captured my neutral ring four W149. Another new player,
AURA, had
transited W149 this turn but that's all that I knew about him.
OK, my tentative strategic
plans are to:
- Confirm that PION is a
merchant and have him haul for me for
four to six
turns.
- It's only turn 5 and I
know the location and world numbers for both
PION's and probably VELA's
homeworlds. I'll attack VELA first. I'll try to do so
by turn 9 or turn 10
at the
latest.
- As soon as my success
against VELA is assured I'll cut off PION's
metal hauling
and attack him as my second victim.
In an attempt to confirm
PION as a merchant I declared him a "loader".
I'll try to get quickly to full production at my homeworld
while continuing
exploration in the directions that I have found to be unclaimed thus far.
TURN 6 Score = 941 W = 20 K = 19
A = 9
-----------
On this turn I met two more
new players, YETI and CRAY. I met CRAY
at my ring
five W41 which CRAY owned. YETI moved into my ring three
W157 with a 2-ship fleet. AURA moved into my W149 which he had transited
earlier. PION was confirmed as a merchant. He moved his 2-ship key into my
homeworld at peace. Since I had deliberately not declared him an ally I
captured his fleet. By simple mathematics I could tell that he had loaded
four metal
onto his 2-ship fleet. Therefor he had to be a
merchant. I'll
declare PION an ally and give his key back to him.
TURN 7 Score = 1158 W = 20 K = 19
A = 9
-----------
AURA left my W149 but CRAY
moved into it. I moved into my ring
four W23
and found
that CRAY owned it. At this point I have explored my entire
periphery.
Sadly there are no neutral worlds left to easily capture. To keep up a
potentially winning scoring pace I need to attack someone ASAP.
PION moved a 5-ship key to
my W225. It produces 5 metal per turn
and there are
19 metal stockpiled so he has plenty to haul. My W207
produces 9 metal per turn so PION knows where to pick up lots of metal.
PION has also given a
zero-ship key to me at his homeworld. I assumed
that he would
put some ships on it this turn and therefor moved it
to his W205.
TURN 8 Score = 1298 W = 21 K = 20
A = 9
-----------
PION moved to my my homeworld with his fleet from
W225 = 5/10.
He also moved a 3-ship fleet to my homeworld,
apparently from his W151.
My homeworld will be at full production from
now throughout the rest of
the game.
PION also moved a 10-ship fleet to my W225. He is certainly
being
aggressive at hauling to my homeworld. Is he being
too aggressive?
I'm beginning to think so. I've decide to keep enough Iships on my homeworld
to prevent a
PION move to drive it neutral. If he's going for points attacking
wouldn't make sense. But something just doesn't "feel right" to me.
QUAD has moved a 1-ship
fleet at peace into PION's homeworld, W108.
PION had built 2 ships onto my fleet so my move order to W205 worked.
VELA has given W36 to me. It
appears to be in the part of his territory
which is
farthest from me. He also has a 2-ship fleet at the world carrying
the Silver
Lodestar. If he drops it on W36 then he is really making a serious
attempt to buy my good will.
TURN 9 Score = 1613 W = 21 K = 20
A = 10
-----------
VELA did in fact drop the
Silver Lodestar for me at W36 which I plundered.
He also did a 1-ship robot attack to demonstrate that he is a Berserker.
On the other hand there are disturbing
developments on the PION/QUAD
front.
QUAD has moved a second
fleet, this one with 5 ships, into the PION
homeworld. He moved another fleet from W57 through PION's W108 to and
possibly onward through PION's W59. Although PION had Iships
= 13 at
W108 he did not ambush QUAD. So PION has declared QUAD an ally.
In addition QUAD seems to know more about the world connections in
PION's
territory than I do. QUAD moved still another fleet through my W39 and was
ambushed by me. Since the only world he could have come from was PION's
W151 QUAD must have moved his fleet to W39 and back to W151 as an
exploratory move.
At this point it is clear
that PION is working more closely with QUAD than
he is with me.
In addition PION has given me only one 2-shp fleet and no
worlds at all to
plunder. Meanwhile he has already gained hundreds of
points from
hauling metal to my homeworld.
From what I've seen of
PION / QUAD and the nice gifts I received
from VELA I
decided to switch my first target from VELA to PION. I sent
my 2-ship
fleet from PION's W108 back to W205 with intentions to AH
W205 on turn 10. I also sent a 2-ship fleet into W151 with the same purpose
in mind.
Meanwhile I moved six fleets totaling 86 ships to my W39. From
there they can
reach PION's homeworld in one move. Finally I moved
one
12-ship fleet to my W225. It can also reach PION's homeworld
in one move.
I intend a blitzkrieg attack into PION's homeworld
on turn 10.
My borders with all other
players remain quiet.
TURN 10 Score = 2011 W = 21 K = 21
A = 10
------------
Well PION still hasn't
given me a thing except that one, tiny fleet on
turn 7. This
turn he has four fleets totaling 22 ships dropping metal at my
homeworld. Strangely, at his homeworld on this turn
PION has only one
fleet with one
ship. QUAD also has a 1-ship fleet there. PION has 20
Iships and 49 metal stockpiled. But this means he will not have full
production at his homeworld on turn 11. This is very
strange behavior
for a
merchant. If he really wants to score points why has he not given
his homeworld to someone? And why in the world would he allow
it to
be at less
than full production on turn 11?
In any case I have fleets
at all three worlds connected to my homeworld.
The fleets are not as large as I would like. But they will be ready to
ambush
PION's four fleets as they leave my homeworld
this turn since I will declare
PION both a non-ally and non-loader.
My invasion force headed
for PION's homeworld is in place. Based
on the turn
9 fleet movements that I could see I believe it is likely he has
not seen my
fleets marshaling for invasion. I'll send four fleets totaling
79 ships to his homeworld
this turn. Two small fleets will head
for other
PION worlds with the intent to AH there on turn 11.
Also on this turn QUAD
moved a 9-ship fleet into my ring three W185.
We met at this world on turn 4. He left it to allow me to capture it on
turn 5.
What is he planning?
I would like to
reciprocate to VELA but I just don't have the resources
to spare
now. Maybe I can get a berserker artifact headed his way in a
turn or two. I
don't want to be attacked by VELA while I'm engaged with
PION and possibly QUAD.
TURN 11 Score = 2266 W = 22 K = 25
A = 10
------------
Well my invasion of PION's homeworld is a success. He had only one
1-ship fleet there which of course I captured. He does have 24 Iships on
the world. So
it will take a 50-ship AH order to be certain to drive the world
neutral. I carried 23 metal with my invasion fleet which I will unload plus the
world has 24
metal stockpiled. The industry is fully suppressed this turn. So if
I capture his homeworld on turn 12 I'll be
able to build 30 ships immediately. I
will start
setting up some metal hauling fleets for this world ASAP.
My forays into other PION
worlds reveal that he had given W72 to QUAD.
Not only that but W72 is showing Plunder = 2/3. So QUAD is another pirate
and PION gave
him W72 at least as far back as turn 7. I was correct that PION
has been
treating QUAD much better than me. OK, that's his prerogative but it's
good to know
where his priorities have been.
QUAD did pull his 9-ship
fleet at my W185 back into his territory this turn.
Was he making some sort of feint or exploring for a pending attack?
ZENO arrived at W36 which
VELA had given me earlier. The world was
undefended so he captured it. However, VELA also arrived with a 4-ship fleet
at peace.
I'm not sure what's going on there.
TURN 12 Score = 2477 W = 25 K = 27
A = 11
------------
I have captured PION's homeworld and immediately have full ship production.
I will aggressively explore with intent to capture throughout PION's
territory. I'm
starting to get rolling with world and key captures. I need to accelerate my
scoring although all along I've plundered as much as I can without affecting
homeworld ship production.
I've found that PION gave
W59 to QUAD this turn. I also see that he has
given W20 to
IRIS and that IRIS has plundered it. I'll be going to five more
PION worlds this turn
TURN 13 Score = 2770 W = 30 K = 26
A = 12
------------
I captured four worlds this turn and VELA
gave W36 with the Silver Lodestar
to me again.
He must have recaptured it from ZENO.
I continue to expand into
PION territory. This turn one of the worlds I moved
into,
W226, PION had just given to BORG and I found BORG owned W93 with
Plunder=1/3.
I need the worlds for scoring. So no matter if he gives them to IRIS,
BORG, or
whomever I'm still going to try to capture them. Hopefully I won't wind up
fighting
all of the
other players at once!
Speaking of fighting, QUAD
has moved two fleets with 32 ships into my W185.
I suspect that he's serious about an invasion this time. I'll have to
divert some
fleets and ships
to defense.
TURN 14 Score = 3213 W = 35 K = 26
A = 12
------------
I've picked up another five
worlds and my scoring is improving. Unfortunately
I'm going to have to shift even more of my forces to defense against
QUAD.
He pulled back from W185 but now has a total of seven fleets and 108
ships
combined at worlds 34, 239, and 253.
I don't know why he is being
so tentative in his approach but my counterattack
will be
anything but tentative. On turn 15 I'll have ten fleets and a total of 219
ships at those
three worlds. The ship production from PION's former homeworld
is really
helping against QUAD. Thankfully all of my other borders remain quiet.
TURN 15 Score = 3669 W = 36 K = 27
A = 12
------------
QUAD is still attacking
slowly. He has shifted his forces so that he has four
fleets totaling
113 ships threatening my homeworld through my lightly
defended
ring one W68.
I've got two fleets and 42 ships at W185. I have four fleets and 86
ships at W239.
I have four fleets with 104 ships at W253. QUAD's shift of his axis
of attack
has much of my available force badly out of position to defend my homeworld.
Despite this I am still
confident I can hold my homeworld. Given even one
more
turn without
QUAD actually charging headlong into my homeworld
I'll be OK there.
The builds at my original homeworld plus those
I'm sending from what was PION's
homeworld will see me through. Unless QUAD changes his tentative pattern I'll be
fine. I'm
moving two fleets and 56 ships into my ring one W68 on this turn. Once
they are in
place he can't just blow though that world with little loss from an ambush.
So what to do with all of my
"out of position" forces? They may be wrongly placed
for defense
but they're well placed for... attack!
I had probed QUAD's W134 last turn.
So I can see that it has only one Iship and no
fleets at all there on turn 15. Based on this
probe and the
pattern of QUAD's movement during the early turns I am convinced
that W105 is
the QUAD homeworld. I will send two fleets and 79
ships into his
homeworld. If nothing else this will force him to shift a lot of ships to
defense.
TURN 16 Score = 3980 W = 39 K = 32
A = 12
------------
Alright!! My attack on
QUAD's homeworld is a success. My 79 ships are just
enough
to pirate
capture two QUAD and two PION fleets totaling 24 ships. With only 6 Iships
his industry
is fully suppressed. QUAD's invasion force in my territory now totals nine
fleets and 154
ships. But I've neutralized his homeworld and have
enough force to
protect mine. It will take a few more turns but eventually QUAD is toast.
I will AH QUAD's homeworld and at a minimum drive it neutral. I'll also
start spreading
out through
QUAD's area. Since he too is a pirate capturing his already plundered worlds
won't help my
scoring as much as I would like. But I can't leave an intact QUAD empire in
place. I'm not
going to give him a chance to rise from the ashes against me.
This turn I also met two new
players, SIVA and EDEN. I'm continuing exploration into
new areas but
am severely limited by lack resources due to the war with QUAD. I can see
eight other
players and their scores this turn. My score is 750 points ahead of all the
other
scores that I
can see. So despite what I consider my somewhat slow scoring pace so far
so good
versus my competition.
TURN 17 Score = 4437 W = 41 K = 34
A = 15
------------
I have captured QUAD's homeworld, W105, plus two other worlds of his. The
homeworld is immediately at full production. QUAD is continuing his doomed
attack on my homeworld. He moved a fleet with 22 ships in this turn. But
I've got
four fleets
and 62 ships including the builds for this turn. So I can both protect my
industry and completely destroy his fleet if he stays.
Next turn I'll have plenty
of fleets and 163 ships at my homeworld. QUAD is
still boring in
with six more fleets and 100 ships. But he can't really hurt me any
more so long
as I move carefully for the next two or three turns. Unfortunately
I've got eleven fleets and nearly 200 ships tied up near my homeworld in order
to be sure
of saving it from QUAD's attack
I will spread out as
quickly as possible through QUAD's empire. Apparently
he poured
almost all of his ships and keys into his attack on my homeworld.
His
empire appears
to be only lightly defended. Too bad much of it has already
been
plundered.
I am also starting an
invasion of EDEN's worlds. I can see the scores of
eight other
players this turn. The highest of them is at 4,138 points or 299 behind
my score.
TURN 18 Score = 4764 W = 44 K = 34
A = 15
------------
Oh no! The game is over and
VELA, revealed as Lin Goldstein, has won with
8,598 points. I could see his score last turn as one of the eight scores visible to
me. Even if
he was the player with 4,138 points last turn he still scored at least
4,460 points this turn. My guess is he used at least ten or so PBBs to do it. It's yet
another demonstration of how dangerous a Berserker can be if he survives into
the
later turns of
the game. Good job Lin!
In post-game analysis I
still think that I played correctly given the information
available to me. I'm well aware that both Merchants and Berserkers can score
heaps
of points quickly
and win games. I can't help wondering what would have happened
if PION had
given just a couple of worlds to me during the early turns. I probably
would have
stayed with my original strategic plan of attacking VELA / Lin first. But
there's
no way to
tell how that battle might have turned out. Even if I had beaten Lin I may well
have been
sufficiently damaged that QUAD's attack would have finished me off. Or
maybe something
else entirely would have happened.
Anyway, that's what keeps
me coming back to Starweb. Every game is sufficiently
different to keep my interest level high.
Here are the ending scores.
I finished second and did well measured by resources
owned but was badly beaten in points. Thanks to everyone for a fun game.
Final Results --
Victory-point limit was 6000
(1) Lin Goldstein
[VELA]: Berserker (Score=8598,Worlds=9,Keys=20,Ships=39,Industry=37,
Mines=29,People=218,Robots=60,Artifacts=11)
(2) Jack Fulmer
[GORN]: Pirate (Score=4764,Worlds=44,Keys=34,Ships=604,Industry=102,
Mines=168,People=2810,Artifacts=15)
(3) [IRIS]: Pirate (Score=4419,Worlds=26,Keys=33,Ships=362,Industry=43,
Mines=96,People=1693,Artifacts=11)
(4) [CRAY]: Pirate (Score=3937,Worlds=43,Keys=63,Ships=688,Industry=77,
Mines=168,People=3188,Artifacts=17)
(5) [ZENO]: Pirate (Score=3581,Worlds=24,Keys=19,Ships=313,Industry=37,
Mines=85,People=1536,Artifacts=7)
(6) [ONYX]: Merchant (Score=3464,Worlds=19,Keys=11,Ships=220,Industry=7,
Mines=89,People=1350,Artifacts=3)
(7) [RAMA]: Empire-Builder (Score=2905,Worlds=11,Keys=10,Ships=155,
Industry=31,Mines=54,People=947,Artifacts=3)
(8) [PION]: Merchant (Score=2605,Worlds=1,Keys=4,Ships=39,Industry=30,
Mines=2,People=100,Artifacts=3)
(9) [SIVA]: Empire-Builder (Score=2431,Worlds=1,Ships=12,Industry=6,Mines=4,
People=46)
(10) [QUAD]: Pirate (Score=2396,Worlds=10,Keys=7,Ships=86,Industry=3,Mines=37,
People=567,Artifacts=1)
(11) [WYRM]: Berserker (Score=2305,Worlds=21,Keys=13,Ships=241,Industry=76,
Mines=101,People=1072,Robots=131,Artifacts=12)
(12) [BORG]: Pirate (Score=1709,Worlds=1,Ships=1,Industry=1,Mines=4,
People=101)
(13) [AURA]: Empire-Builder (Score=1645,Worlds=1,Keys=1,Ships=12,Mines=2,
People=5)
(14) [EDEN]: Artifact-Collector (Score=1185,Worlds=22,Keys=21,Ships=380,
Industry=69,Mines=97,People=1658,Artifacts=9)
(15) [YETI]: Merchant (Score=130,Worlds=2,Ships=23,Industry=2,Mines=13,
People=181,Artifacts=1)
----------------------------------------------------------------------
QUESTIONS - Can anyone answer these?
Last issue, which was 6 years ago I asked if anyone was interested in a private game entitled - RESOURCE LIMITED SCORING SW GAME. There was no interest.
So the question now is – How much interest is there in an old fashioned Play by mail game like Starweb? Who makes up the core playing pool AND are there any new players out there willing to give up real money to play when there are so many free games on the web?
----------------------------------------------------------------------
STARWEB EMAIL DISCUSSION GROUP - is now available on the web.
Look for our MAPPER'S SECTION on the SEDG Web Page.
http://www.accessv.com/~somnos/sedg.htm
-----------------------------------------------------------------------
FEATURE - THE SWAP CORNER
Just a note about the Starweb Analyzer V1.5
As of Windows 7 & 8 we have been receiving intermittent feedback from new players that they cannot get the trial analyzer to install. This does not happen in all cases and we have many players who have installed it on Windows 7 successfully. We are not sure where the incompatibility is arising from but we have determined that it is in the windows installer and not the Starweb Analyzer. If you encounter this problem it is easy for us to package the Analyzer so that it can be placed on your computer in the C:\Program area and it will work properly. If you encounter this problem just contact us for the fix.
-----------------------------------------------------------------------
CORRESPONDENCE
Well, that's it for Volume 90. Don't be afraid to submit articles or
suggestions. They don't have to be long. Address your correspondence
to Elliot Hudes at somnos@compuserve.com