By Elliot Hudes
I like to pride myself on being a fairly decent player.
When I want to rank or win I usually do pretty well for myself. When Im
just playing for fun (isnt this what we always do?) I still try to ensure
that Im on the winning side. Its not often I find myself in a hopeless
position where death is imminent and I have a few turns to figure out how
to best occupy my time. Ive been here before and I know that dropping
out is not an option. Better to get a pointy stick and put it in your opponents
eye than to email FBI and ask to be dropped. So what did I do? Lets start
at the beginning.
You have already read Jacks account the past two
months regarding this particular anonymous game from his, the winners
perspective. Remember, he had a small empire, poor resources and was surrounded
by pirates but a game like this can turn in an instant and is much more
unpredictable than a diplomatic version of Starweb.
To begin lets keep Jacks book keeping, of which
player was which. In an anonymous game the names; world numbers and fleet
numbers are scrambled so that two players comparing worlds would not see
the same information. This makes it hard to cheat and also a bit confusing
to sort out who was who after the game.
As I said to Jack after reading his draft copies,
Oh my God - I'm pirate 2!!!!
My universe (Players named as Jack named us)
Berserker 1 Jack Fulmer (KING)
Pirate 2 = Me (MIRA)
Apostle 1 = Randell Carr (QUAD)
Player 4 = Ken Dooley (DUNE Pirate)
Player 6 = Ken Andrews (OOZE Merchant)
Player 7 (Then Pirate 3) = John Muije (FATE-Pirate)
Player 9 = Graham Lythell (HALO Berserker)
Player 10 = Kenneth Gailliez (EDEN)
Players I never met
Player 8 (Then Pirate 4) = Steve Dooley (UNIX Pirate)
Player 5 = Roberto Flaibani (JUNO - EB)
Pirate 1 = Darrell House (TOMB) (One of Jacks opponents)
Players neither Jack nor I saw
Player 11 = Gerry Paulson (ISIS)
Player 12 = David Tiffany (PION)
Player 13 = Jeff Hancock (GORT)
Player 14 = William Wymer (ROME)
TURNS 1 3 Expand, Expand, Expand
The usual rapid expansion and explore all available connections. I find just enough keys to explore each world and cannot bring home any metal. On T3 I find 2 worlds with industry and sadly a homefleet keeping them neutral. I have enough keys to explore every world, attack the neutral industry worlds and even bring 4 keys and 5 metal to the HW. It appears to be going fairly well.
TURN 4 First Contact
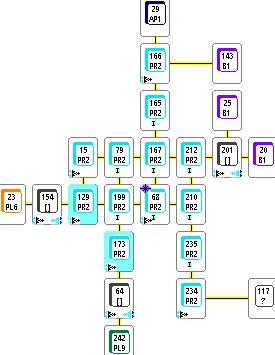
This map shows my status as of T4. For those of you new to the Flying Moose Technologies Starweb Analyzer map I shall orient you. The world number appears with the owner abbreviation below it. In my case Pirate 2 worlds are labeled PR2. You will see Apostle 1 (AP1), Berserker 1 (B1), Player 6 (PL6) and Player 9 (PL9) on this map. Below this will be an I, P or both denoting these types of homefleet if they are present. The starburst in the upper left of the world denotes the HW. In my case this is W68, although it will appear with a different number on other players turnsheets due to the Anonymous game scramble. The little ship icon below denotes fleets in the air. On the left denotes my fleets. On the right are fleets of other players. For example you can see at W64, which is owned by [] (meaning its neutral) that I have a fleet there and have met PL9 with his fleet also present. If you see a world surrounded with a blue glow that represents weapons fire and alerts you to view this one for some interesting fighting.
On two expansion arms from my HW I capture the ring
3 worlds and dont meet anyone. One of them was W166 and I plan to explore
further. On the map Ive shown the owners of the two connecting worlds
already (W29, W143). The other open area is at W234 and I can see W117
which I intend to explore as well. The map appears to be made of simple
squares and rectangles and runs of two connecting worlds.
I meet 3 players at ring 3 worlds that remain neutral.
There is Berserker 1 (Jack KING) at W201 who will become one of my two
main opponents (and wins the game), Player 6 (Ken Ooze the Merchant)
at W154 (my second opponent) and Player 9 (Graham HALO the Berserker)
at W164. I can see their scores are 0, 0 and 15 so I make a note in my
turnsheet log that Ive met merchants and/or berserkers (This is a log
I keep in anonymous games where I jot notes each turn in with my guesses,
theories and tests (no the art didnt attach hes not an AC, I was not
ambushed so he declared me ally).
How did I handle first contact? I mistakenly thought that a merchant would want to haul for me (Player 6 never had this intention). Neither merchants nor berserkers needed worlds while I could plunder them. My intent was to score well and take out a player in the game. Honorable pirate goals I thought.
Player 9 (HALO/Berserker) We met at W64 where he
had two keys of 2 and I had a key of 5. I sent my key out for metal and
brought another smaller key here to capture the world if Halo left it for
me. I probe deeper (W242) as I pull out. I fully expected if he was a merchant
that he would come in deeper to my worlds while dropping a CG to show me
his intent.
Player 6 (OOZE/Merchant) and I meet at W154 with a
key each where I outgun him 5 to 3. Im very consistent and send my key
out for metal while bringing in a smaller key for the potential capture.
I probe deeper as I leave.
Berserker 1 (KING/Jack) at our contact point, W201,
we each have a key and Im outgunned 4:2. In the previous cases I met the
players on a two connector so its obvious where they came from. In this
case there are 2 connections B1 could be from. So I use the same trick
bring in another key to the contact point and send this key to one of
the connections to determine where B1 came from and perhaps grab a world.
I chose W25 but ultimately it turns out he owned both and W143 from my
apparent open border at W166. The map reflects this.
I looked at my turn and thought not bad. I had 13
worlds and more exploratory room. There was 40 industry and 45 mines. So
I could build but I would have to look to plunders from my intended victim.
And finally of the three closest players none of them were coveters of
worlds and I could see me finding an agreeable merchant, berserker and
one target amongst them. Boy was I mistaken :-).
TURN 5 Things Look Good!
On the two expansion arms I had previously I claim
a clean biconnector world, W117, so obviously someone isnt expanding or
is a dropout. On the other limb I went to investigate 2 worlds, W29 and
W143. I meet Apostle 1 (QUAD/Randy) at W29 and claim unprotected W143 B1
world. This was why Jack was getting nervous about me. My similar exploration
from the arm we met on (W201) the previous turn also captures an unprotected
world (W25) that is adjacent letting me own a Ring 2 and Ring 3 world.
It is also clear to us both now that Ive found his ring 1 world W170.
Similarly B1 and Apostle 1 send small keys to my adjacent world W166).
I hadnt intended to invade B1/Jack but I stumbled
deep into his area on two fronts and captured unprotected worlds so I figured
that destiny decreed that he be Target #1. Meanwhile B1 brought a new key
to our first contact world (W201) showing me he was unwilling to let
me have it. So I decide to plunder W25 and W143, the worlds Ive captured
(remember its a poor universe and you need to take stuff from others :-).
This would alert him to my character also. I take one of the keys back
to our first contact world (W201) to reinforce it and send the other deeper
into B1 territory to investigate ring 1 W170.
Now I figure I should find ways of being friendly
to anyone else on my border so I dont have to worry about multiple fronts.
Ive done this in previous games, even gifting a plundered world to another
pirate as a gesture saying, Lets be friends and find other targets.
So in my first attempt at being friendly to bordermates
I withdraw from the Apostle 1 border world (W29) and I drop the Blessed
Pyramid to show just how friendly I am. Will he notice? Good anonymous
players study their turnsheets for just these subtle ways of communicating.
Player 9 (HALO) withdrew from our first contact world
(W64) letting me have it and the key. My probe of his area shows me a not
too exciting ring 2 four connector world.
As for Player 6 (OOZE-Merchant), he does the recognizable merchant thing and moves one world in to my area (W129-Ring 2). This lets me capture the ring 3 first contact world (W154) which in itself is a friendly looking gesture but he didnt drop any CGs and he didnt put his fleet at peace. In previous anonymous games Ive managed to get up to 2 merchants working for me but this smelled more of a player scoping out my territory than an attempt to find a merchant client. The ring 2 world (W129) he was at had 1 ISHP and 1 PSHP so I put them on conditional fire versus his 3 ship key. Remember, each odd numbered homefleet gets its firepower rounded up so 1 PSHP has 1 shot as does 1 ISHP (a little Starweb trivia for you). I also designate an 8 ship hauling fleet to visit the adjacent ring 1 world (W199). If Player 6/OOZE comes here I will capture his key. The two keys of 1 from our first contact (W154) will come to the ring 2 world (W129). With the industry at ring 2 if he stays to fire then he will become a key of 2 ships and I will arrive and have 5 ships to deal with him. I feel that this is adequate defensive work on this front. And the world I probed W23 was a 2 industry biconnector world and would be his ring 2 which was great for his defense.
Another thing I did this turn was to declare all 3
players LOADERS. I figure if I watch the worlds they are at and they try
to load I could see which of them was a merchant. Their scores were 5,
-5 and 0. (Apostle 1 was 215 and easily stood out from the others). As
far as I was concerned they were all merchants and/or berserkers (and I
was correct) and I should have no problems with them (incorrect).
Hauling Im coming to the HW with 18 metal and going
out for 30 which is fantastic for T5 without a merchant. I figure I will
build 20 ships on T7 and be at full builds on T8.
T6 Everything is Going My Way (Not!)
First the exploration arm. I have hit a 4 connector
(W152) and met 3 players. We all have keys of 1 or 2 ships so nobody has
much of an advantage. I see my old neighbor Player 9 (HALO) as well as
Player 4 (DUNE-Ken) and Pirate 3 (FATE-John). Since I only have a key of
2 ships I decide to cautiously explore a connection (W28). This allows
the meeting world to go to someone else and I figure I can get some mapping
information.
Now how about my other neighbors? Player 9 (HALO)
remains on his side of his border and I dont see him here. I can see 6
players and there are still 3 scores clumped at 5, 10 and 10. So I figure
Player 9 must be a berserker (correct) cuzz if he was a merchant he sucked
at it :-). Player 6/Ooze decides to send his key back to our first contact
world (W154) on the way out of my area. He doesnt load, drop CGs or invade
me. For the life of me I cant figure out his game plan but I figure he
is benign at the moment (Wrong!)
Meanwhile Apostle 1 does something unexpected. He moves his key of 1 ship deeper into my area to a ring 2 world (W165). Why is an Apostle going to try and map me? I decide to fire on his key of 1 and send out haulers to ring 1 (W167) and ring 2 (W165) to deal with him if he is up to mischief.
It seems my neighbors are acting oddly but not overtly
hostile so I can concentrate on B1/Jack. My foray deeper lands me at the
ring 1 world (W170). Jack is there outgunning me 4 ships to my 1. He has
retreated from our ring 3 first contact world (W201) letting me capture
it but he has sent small keys to the ring 2 and ring 3 worlds (W25 and
W143) I had grabbed and plundered. I left homefleet to make it harder for
him to reclaim but Im not able to send anything big in yet. I figure my
first real surplus of ships will be on T7. Meanwhile I just want to tie
up his ships, disrupt hauling, get a few plunders and map.
I only have 10 builds this turn at the HW and I commit
them to the hauling effort. I manage to bring in 30 metal and go out for
30. I wonder if this could have been one of my mistakes. Perhaps if I had
sent more force in early I could have been more successful. B1 already
knew I was hostile and my waiting for full builds would obviously work
for him too.
As to the scores the remaining ones were 329/441/579.
I presumed the 329 score was Apostle 1. Since my score was 507 this meant
that Player 4 and Pirate 3 were either Pirates and/or EBs. (Remember Jack
named Pirate 3 on T20 from seeing a pirate capture. I use his nomenclature
so you can keep track of the characters but I didnt know he was a pirate
yet).
Turn 7 - Still Going According to Plan!
Exploration Lucky for Player 9 (HALO) everyone left
the 4 connecting W152 meeting world. He claims the world. I stumble into
the Player 4 (DUNE) connection (W28) and see his key come flying by. So
I figure Pirate 3 (FATE) went home also as he flits to W224. I can surmise
where they all live. This leaves W162 as the Player 9 (HALO) connection.
I plan for this key to roam around mapping until it is killed so I head
to the unknown Player 4 connection W198.
Player 6 (OOZE) continued from our first contact world
(W154) back to his empire (W23). This is a good sign.
Apostle 1 Ive captured his key of 1 at my ring 2 (W165) and I hope he reads this as a dont trespass warning and not overtly hostile. After all I did leave him some apostle art and he was in my area uninvited.
B1 He destroys my small key at ring 1 (W170), recaptures
the ring 3 (W143) world but fails to capture the ring 2 (W25) cuzz Apostle
1 has blundered in with a small key. Ive sent a key of 12 ships to our
first contact world (W201) and it will be the start of my invasion. A 16
ship key goes to the common B1 and Apostle 1 border (W166). Its for metal
but available if anything happens here from either of these neighbors.
I send a key of 5 ships back to B1s ring 2 world
(25)
again.
Hauling is on track I can bring in 30 metal per
turn.
Turn 8 Something is not Quite Right 2 Enemies?
Exploratory fleet I left Player 4 territory into
Pirate 3 (FATE) at W198 and it was plundered. My theory that Pirate 3 is
a pirate is supported. I see a connection (W224) back to our common meeting
world. I decide to explore it so I have a route home with my key.
Player 9 (HALO) still stays on his side of the border
and in fact I dont think I saw him again for the remainder of the game.
Apostle 1 I havent heard from him either except
that the 1 ship key he had in B1 territory stumbles onto my B1 first contact
world (W201) and gets pirate captured.
B1 I have those 12 ships ready to fly in. In Jacks
account he knew that I was invading cuzz he probed and saw these 3 keys
here (W201). Well, he was right but not exactly because of the 3 keys.
One was a hauler, one was Quads and one was the hammer! At ring 2 (W25)
my key of 5 ships is met by B1 who has 10 ships. I decide that it would
be best to run to ring 1 (W170) since I would be destroyed if I stay. I
also have an unknown world (not viewed yet) that connects to ring 1 (W20)
from our first contact world and I decide to bring my 12 ships through
to bring the fight directly to ring 1 and bypass those 10 ships he has
at ring 2. Its a risk cuzz this could be an industry world with a large
ambush.
Player 6 (OOZE) here is where I got worried. Player
6 has showed up again at our first contact world (W154) with 8 ships. Its
not a large armada but its not at peace and it suppressed the 1 industry
there so obviously Im not on the ally list. It looks ominous but its
not a large invasion and Im already committed to fighting B1. So I decide
on an Equal Force defense. This concept says that if I shadow a fleet
with equal force and they fight, eventually both keys are dead. If the
enemy keeps moving no harm is done. So I bring a fleet of 8 to meet him
and another fleet of 8 ships to the ring 2 world (W129) on the inward side
to my HW. If its innocent they can haul metal.
Hauling is going well and Ive plundered some rather
useless worlds. I have 728 points but I can see a couple of players already
into the nine hundred area.
Turn 9 My Brain Says Im Dead But My Body Doesnt
Know It Yet!
Player 6 (OOZE) - Has a major invasion force in my
area now. In total 115 ships on 4 keys. The first contact world (W154)
has been fired on and made neutral and Player 6 reinforced. He has 41 ships
to my 8. He also overflew to my ring 2 W129. I have 9 ships on 2 keys but
he has 2 keys also with 84 ships. Its going to be a rout!
I dont see any activity from the Apostle 1 border (this will change) or the Player 9 (HALO) border.
Meanwhile from that area where I met 3 players (W152)
I have gotten my key to W224 which is adjacent and captured an undefended
world from Pirate 3 (FATE). Coincidently Pirate 3 just came over the border
to my world (W117) with a small key. I hope I havent infuriated another
player.
Now in B1 territory things were going relatively well.
B1 robotized the ring 2 world (W25) and didnt fire on me. He brought another
15 ships to deal with me but Ive gone! This key and the one going thru
that unknown ring 2 world (W20) have arrived at ring 1 (W170). I only lost
1 ship to the homefleet at W20 and I have 15 ships at ring 1 now. My reinforcements
are at ring 3 first contact world (W201) with 29 ships. They are facing
the defense force of B1 2 keys with 30 ships.
Tactics and Philosophy or What Do I Do Now?
If I only had to fight B1 I think I could have prevailed.
While its true that we had equal firepower and it could have just been
a war of attrition, I was already inside at ring 1 and the ring 2 world
necessary for B1 to reinforce his forces facing me at our first contact
world. I could have flown in deeper and faced his force with my outgoing
wave. I was on the offense and I think I could have won.
The problem was I was now on defense and if I didnt
siphon any ships to this battle Player 6 would be at ring 1 next turn and
at my HW in 2 turns. To survive I had to deal with Player 6. Inside B1
I would retreat and gift a key to B1 and see if it was not too late to
placate him. After all, I hadnt damaged him yet and if I cleared out of
his ring 1 and left he may have similar problems to mine with multiple
players and be happy to be left alone.
My score is 790, Im not picking up new worlds, Im
under attack and I see scores over 1000. Survival becomes my new goal.
T10 Didnt They Know Threes a Crowd
OK, lets count. Player 6 now has 140 ships in my
area. He destroyed my key at the first contact ring 3 (W154), destroyed
two keys at ring 2 (W129) where I came with my last turn builds (33 ships)
to the rescue. Only he has 81 ships there now on 3 keys. Im still fighting
B1 while retreating. At his ring 1 (W170) he comes out with multiple keys
and 34 ships to deal with my intended blockade. I retreated to ring 3 (W201)
where he reinforced and has 40 ships to my 31. Bad things always come in
threes. Here it is. Now Apostle 1 has slipped over my border with 2 keys
and 48 ships (W166).
I cant prevail against 2 opponents so what can I
do versus 3? Hey Rick are you sure this is an anonymous game. They sure
look like they know what they are doing together ;-). This is one of the
reasons Im not a big fan of anonymous games. Luck has been given a bigger
hand in these games. If you are unfortunate enough to be surrounded by
warmongers and they all target you then you are toast. Besides, the players
that absolutely require cooperation and will only score based on your ability
to help them are in short supply in anonymous games. It makes sense. You
wont see many Art Collectors or Empire Builders here. And as Ive found
out some Merchants join for the military advantage their double hauling
affords them. On the other hand, Anonymous Starweb is a nice break from
endless emails from allies and opponents alike. You can play more games
with less time consumed. And if its the military side of the game you
enjoy this has more of it than the regular games.
The other small issue I noted last turn was Pirate
3 (FATE) had slipped over my border. He went back and as I got my key back
to the first contact world I noticed he was firing on that Player 9 (HALO)
world (W152). Perhaps thats why I never saw these guys much they may
have been knocking heads elsewhere in the galaxy.
My plan was basically to continue to withdraw from
B1 even if he took potshots at me and concentrate on Player 6 (OOZE). I
determined that I would use each of my gifts in this game in the hope of
getting help. This turn I gifted Apostle 1 the world he was at. He would
get little pleasure capturing worlds that I would give him anyway. I decided
to try to placate B1 again. I gifted another key at our common ring 3 (W201).
I kept my HW well stockpiled with metal while this
was occurring but with 3 players moving in on me I realized that I could
not let my HW fall to them intact. I was already thinking of destroying
myself.
I decided to bring as much as I could to ring 1 in
my defense. I took my fleet from ring 2 (W129) and sent it along a path
away from my HW that ultimately landed it at ring 1 (W15W79W199). Since
Player 6 had never made it to ring 1 he might think this key was flying
home and perhaps he would take his armada in the wrong direction and afford
me more time to prepare for him.
Turn 11 Its Three Against One
Its amazing how much easier your turn gets when you
have no good options.
Lets see Apostle 1 shot at the world I gifted him
(W166).
B1 I have removed all forces from his area now and
he should see my second gift. What did he do? He fired at me at ring 3
(W201) as I ran. He has 88 ships on 4 keys. I have to laugh cuzz he emptied
the gift key I gave him. My forces ran to the HW except for one small key
that went to my ring 2 for metal. He has started his incursion by arriving
at my ring 2 (W212) with 31 ships of his own. I decide to gift him this
ring 2 world and flee. This was to be my final gift to him. If he was still
sore at me then tough beans. I was through apologizing <G>.
Meanwhile Player 6 (OOZE) is certainly taking his
time to finish me off. He doesnt take the bait of going the wrong route
to my HW. In fact he doesnt arrive at ring 1 at all. He brings all his
forces to ring 2 (W129) to consolidate them. I left a ship on each of the
two neutral keys I lost there as I fled so that he would need to expend
effort to capture them. He has 135 ships on 6 keys and has captured W129.
Now that Im looking at these turns again I have no idea why I did what
I did. I took the 54 ships I had at my ring 1 (W199) world between Player
6 and me and took them to the ring 1 world (W167) that was common between
B1 and Apostle 1. I understand that placing a barricade or ambush at ring
1 would slow them down. I dont understand why I didnt drop some ships
on the ground before leaving. I think I was trying to place as large a
force at ring 1 as I could in the hope that one of the invaders would step
in and give me ships in pirate capture. I brought a lot of other keys to
W167 too.
In my retreat from the Pirate 3 (FATE) area I catch
sight of another battle (W162) between Pirate 3 and Player 9 (HALO). Yup,
they were busy fighting each other and not worried about me.
T12 Under Fire At Ring 1
In Jacks account he doesnt understand how I could
leave one of my ring 1 worlds (W210) with only 1 ship protecting it. Well,
heres why and it almost got him too. First, I could not fight at both
ring 1 worlds versus three different players. Second, I thought my best
bet was my Pirate capture plan at the other ring 1. The World he came to
(W167), had 152 ships of mine on 11 keys and they faced his 2 keys with
59 ships. If he had 51 ships or less they would have become mine. I was
very disappointed. I decided to stand and fire.
B1 also took the ring 3 world (W201) with 31 ships
and my ring 2 world (W212) with another 43 ships. Apostle 1 also moved
one of his small keys in on me but he only came to ring 2 (W165).
Player 6 (OOZE) crept in at his maddening pace and arrived at ring 1 (W199) with 158 ships on 6 keys. I guess it wasnt so bad that I didnt leave any homefleet ambush for him to destroy.
Despite all of this my HW was at full building and
I even brought in 25 metal this turn. I had to make a big decision. When
was I going to kill my HW. If I waited a turn and they all rushed my HW
it was possible that they could capture it intact if they thought about
dropping I ships. But even worse both Player 6 and B1 could be berserkers
and I wouldnt have the firepower to stop more than 1 key making a robot
attack and they had many. I make the decision to shoot out the industry
this turn. I plunder it too. Why not?
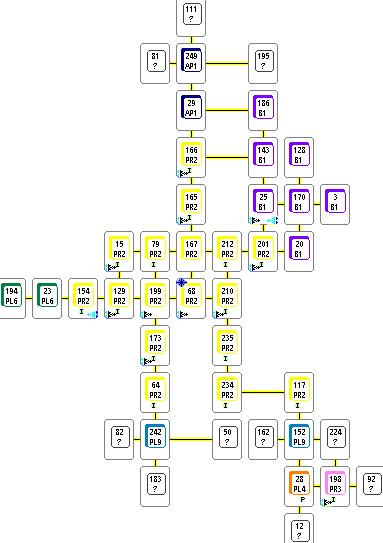
T13 Easy Come, Easy Go
This map shows my status as of T13. Notice the blue
glow of weapons fire at my inner core worlds and the HW. Notice the absence
of the starburst from the upper left corner of W68 my exHW. Its not a
HW any longer.
My HW lies in a smoldering heap. Only 2 industry survive.
I have a key with 56 ships and B1 manages to land with 99 ships on 3 keys.
At ring 1 W167 I still have about 150 ships and many keys left. Apostle
1 had moved 46 ships to the adjacent ring 2 (W165). Meanwhile Player 6
(OOZE) has reinforced and taken the other ring 1 world (W199). He has 198
ships on 8 keys. These guys move so slowly that I risk dying of boredom
before their ships can hurt me :-).
I decide to bring all my fleets at the HW to ring
1 (W167) with my armada to bring the number to about 210 ships and see
if Apostle 1 will wander in deeper and allow me to pirate capture his 46
ships. If that works I would have beaten off one attack and 260 ships would
be a nice number to throw at someone as my last dying gesture.
Gifts well its no use trying to buy off Apostle
1 or B1. So I look around and decide to try and give what I can to some
player who could benefit. Player 9 (HALO) I thought was a berserker so
worlds were not helpful to him. I decide to gift 2 worlds to Pirate 3 (FATE)
for his plundering.
T14 Big Disappointment
Apostle 1 didnt come in deeper so I didnt capture
anything at ring 1. Even more disturbing is Apostle 1 has left my area
completely and gifted me a key of 1 at ring 2. Its been 2 turns since
I gifted anything to Apostle 1 so I dont think he has suddenly come to
like me. Probably something caught his attention at home. From Jacks note
it appears he decided that it would be best to use his ships to score rather
than fight for territory.
As B1/Jack points out in his note, he left my HW to
the only ring 1 world that was safe (W210) with a PBB and his remaining
73 ships just as Player 6 (OOZE) arrived at the HW (W68) with 207 ships
on 6 keys. And since none of us left homefleet he got to capture the plundered
dead HW where I left my plastic art. One has to get ones amusements where
one can. I can see that Player 6 has fanned out to capture 4 more of my
worlds and he manages to avoid my ring 1 world (W167) where I have 210
ships. How do these guys keep managing to avoid me? Player 6 goes to one
of the worlds that I gifted to Pirate 3. Good, maybe Pirate 3 will see
the cause of my pain and inflict a little back at him.
My plans now that my area is not a concern are to
pick a target. My ships were on the far side of my HW from the Player 6
(OOZE) territory. I would have to fight my way through his 200 ship armada
at the exHW or fight my way through my own territory to get to his. Our
first contact world (W154) was ring 4 away. That made his HW ring 7 and
3 turns away if I moved slowly and took fire. This didnt seem wise. On
the other hand there was B1 who fought me even as I tried to placate and
gift him and our R3 first contact point (W201) was only 2 worlds away.
It was a no brainer. I would need to hit B1. But I decided that since everyone
had fanned out to capture my worlds as if I was dead already it might be
worth a turn to go to as many worlds as I can and see if I could pirate
capture anything.
Gifts this turn. I decide to reward Apostle 1 with
a world and another to Pirate 3.
T15 A Little Booty
The capture wasnt as good as I expected. I stopped
Player 6 (OOZE) from capturing two worlds (W15 and W79) and I picked up
two keys with 3 ships each. At the other ring 1 world (W210) where B1 was
dropping his PBB I captured that key of 3 ships too but I had invested
enough ships (118) to grab a lot more. He had departed for his own realm.
At one ring 2 world (W173) I brought a 34 ship fleet and ran smack into
the Player 6 armada of 261 ships (OUCH!)
Well I didnt want to waste any more time and resources.
Clearly the gains I made would be more than lost by the hit I was going
to take from Player 6. I decided to reconsolidate my war fleet and place
as much as I could at a ring 2 and the R3 world (W212 and W201) on the
B1 border. I even had about 60 ships I could place at R2 (W20) on his side
of the border.
I gifted Pirate 3 (FATE) W173 where the Player 6 armada
was so he could get a good look at the war. I also gave Apostle 1 another
world.
T16 The Final March
I have all my ships positioned on Ring 2, 3 and 4
worlds of B1. It is distributed as 64 ships-10 keys at ring 4 (W212), 29
ships-4 keys at ring 3 (W201) and 64 ships-3 keys at ring 2 (W20). I manage
to pirate capture a couple of 1 ship keys that had been busy robotizing
worlds for B1.
I decide to leave 1 small key at each world to fire
AH. I know I cant capture the worlds but if I neutralize them then they
are less helpful in supplying metal. Besides I was willing to do anything
to slow down his scoring even taking away 5 point robotic worlds and I
wanted to annoy B1.
Perhaps I was too impetuous but I decided to place
as much as possible at ring 1 and hit the HW. Perhaps this type of play
would catch B1 with his pants down.
By the way, if you are still wondering about that
that small key of 2 ships, it still wanders around unscathed in the Pirate
3 and Players 4, 9 area. I stumble onto the Player 9 (HALO) HW and catch
a glimpse of Player 10 (EDEN) leaving. I never see him again. The HW is
W45 off of W183 its not on the map yet (sorry).
T17 Ambushes Hurt.
B1 left a 9 ship ring 1 ambush at W170. (OUCH!) Jack
nailed 2 keys of 6 and 7 ships and 3 keys made it through taking the full
hit making the hit 40 ships which I could not afford. I landed at the B1
HW (W128) with 48 ships on 3 keys versus his 98 ships (includes builds).
B1 has twice my firepower and he could easily shield his industry while
blowing me away. I decide that its better if I continue to hammer away
at him as this would tie up his resources that could be out there robotizing
or dropping PBBs. At ring 1 (W170) I had 55 ships on 8 keys. I had a few
smaller keys around to try and disrupt B1 in his scoring but I didnt encounter
him.
So what could I do but fire AI at the HW and bring in my reinforcements. I knew I couldnt win here unless my opponent made a mistake. He hadnt made one yet but I was hopeful I could slow down his scoring at the very least.
T18 The Battle is Lost.
I had transferred most of my ships to one key at the
HW (W128). The idea is to keep the ships alive and dangerous as long as
possible by playing a shell game with them. The keys were expendable at
this point. At the HW I only lose 15 ships and retain 33 while bringing
in 46 more ships on 6 keys. B1 has me outgunned by 182 ships and 9 keys
to my 79 ships.
Meanwhile I had another 36 ships on 5 keys scattered
through B1s empire one their way to reinforce.
T19 T21 Oh the Horror, the Horror!
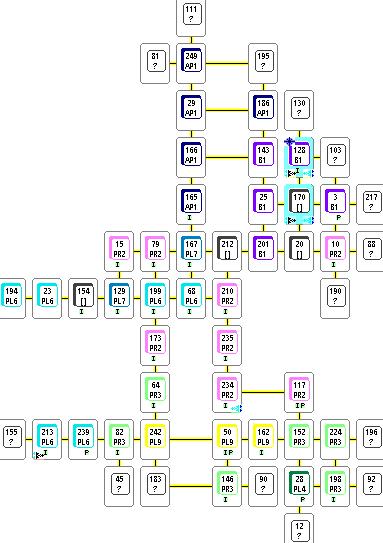
This updated map for T19 shows the blue haze of war
around W170 and the B1 HW W128. Most of my area has been annexed by Player
6, Apostle 1 and B1.
What can I say? I just kept bringing in ships and
firing at the ground, first the industry then the robots. Always B1 placed
exactly what was needed to protect himself and his building capacity.
T22 Courageous? Tenacious? Probably just Stubborn
I had 18 ships at the B1 HW. Do you know what I did
with them? Right. I fired at the industry.
As a side note, do you remember a key of 2 ships that
very early on had found a 4 connector (W152) that was the border of 4 empires?
I never did return it to my area as planned. I got side tracked and explored
into Player 9 (HALO). By T17 I had slipped into Player 6 (OOZE) domain
and I continued to go 1 world at a time until the game ended on T23 and
mapped 6 more of his worlds without opposition and I never found his HW.
T23 Endgame - I made it.
I still had a fleet of 7 ships at the B1 HW. I would
have fired if I had the chance. I ranked 11 out of 15. I didnt even come
in last. I was amazed at that. Have a look at my proud empire.
(11) Elliot Hudes
[MIRA]: Pirate (Score=1985,Keys=2,Ships=9)
The victory score was 7404 and my chief opponent was
Jack Fulmer as B1 (Berserker 1) who won it despite my attempts to slow
him down. As for Player 6 (OOZE) Ken Andrews he was indeed a warrior
Merchant as his score was 109 and 13th place. (So I beat him
Heh!) I found out after the match that Pirate 3 (FATE) was my old friend
John Muije who I had fed many worlds but he only managed a 7th
place. As for Apostle 1 that was Randell Carr who brought in a 6 place.
It was a fun game and it was one of two games in the
past 10 years where I actually got whupped. In both cases I had a blast
trying to do whatever I could to the opposition. But as Ive said before
luck seemed to have more to do with the outcome than skill. I could never
prevail over 3 different players invasion forces. I havent signed up
for another anonymous game yet. Im still smarting from this one <vbg>.
Elliot